Toxic マニュアル
フィルター、ドライブ、モジュレーション、Perform 操作の実践ガイド
概要
Toxic は、2系統のフィルター、3つのドライブ段、LFO、Envelope Follower、Macro を組み合わせて音作りする無料フィルタープラグインです。KVR Developer Challenge 2026 のエントリープラグインとして制作されています。
フィルター部は、レジェンダリーなハードウェアVAシンセに見られるデュアルフィルター構成の発想をもとに、Serial / Parallel ルーティング、Analog / Digital カテゴリ、フォルマント系の動きを現代のDAW用エフェクトとして再構成したものです。特定機種のクローンや公式エミュレーションではありません。
- カットオフ / レゾナンスを中心にしたフィルタリング
- LFO による周期変調
- Envelope Follower による入力追従変調
- Macro による複数パラメータの一括操作
- MIDI Learn によるパラメータアサイン対応
- Perform / Expert の2系統UIによるライブ操作と詳細編集
- Serial / Parallel ルーティングに対応したデュアルフィルター構成
画面構成
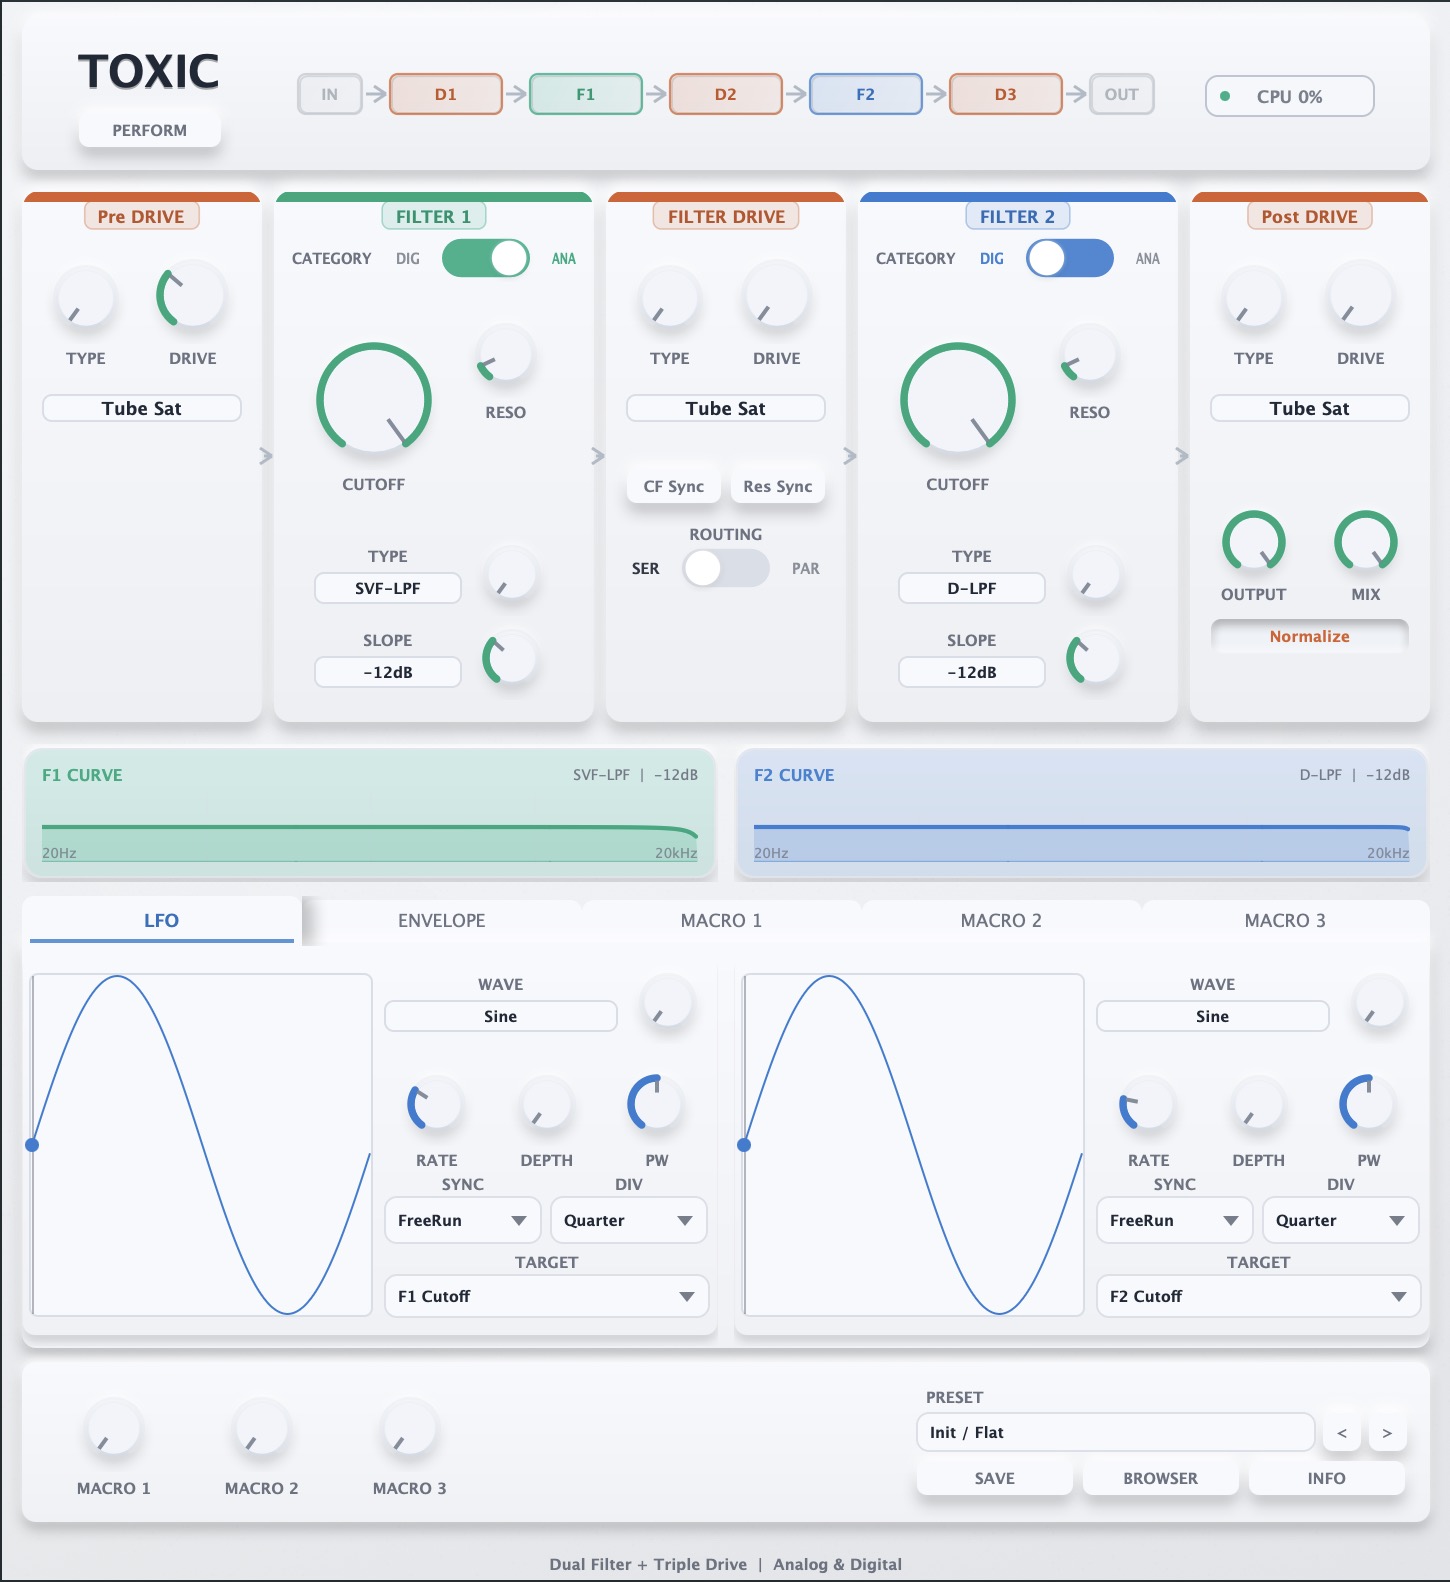
Expert
詳細編集用の画面です。
Drive、Filter 1、Filter 2、Output、Mix に加えて、下段に LFO / Env / Macro の各セクションがあります。
Perform
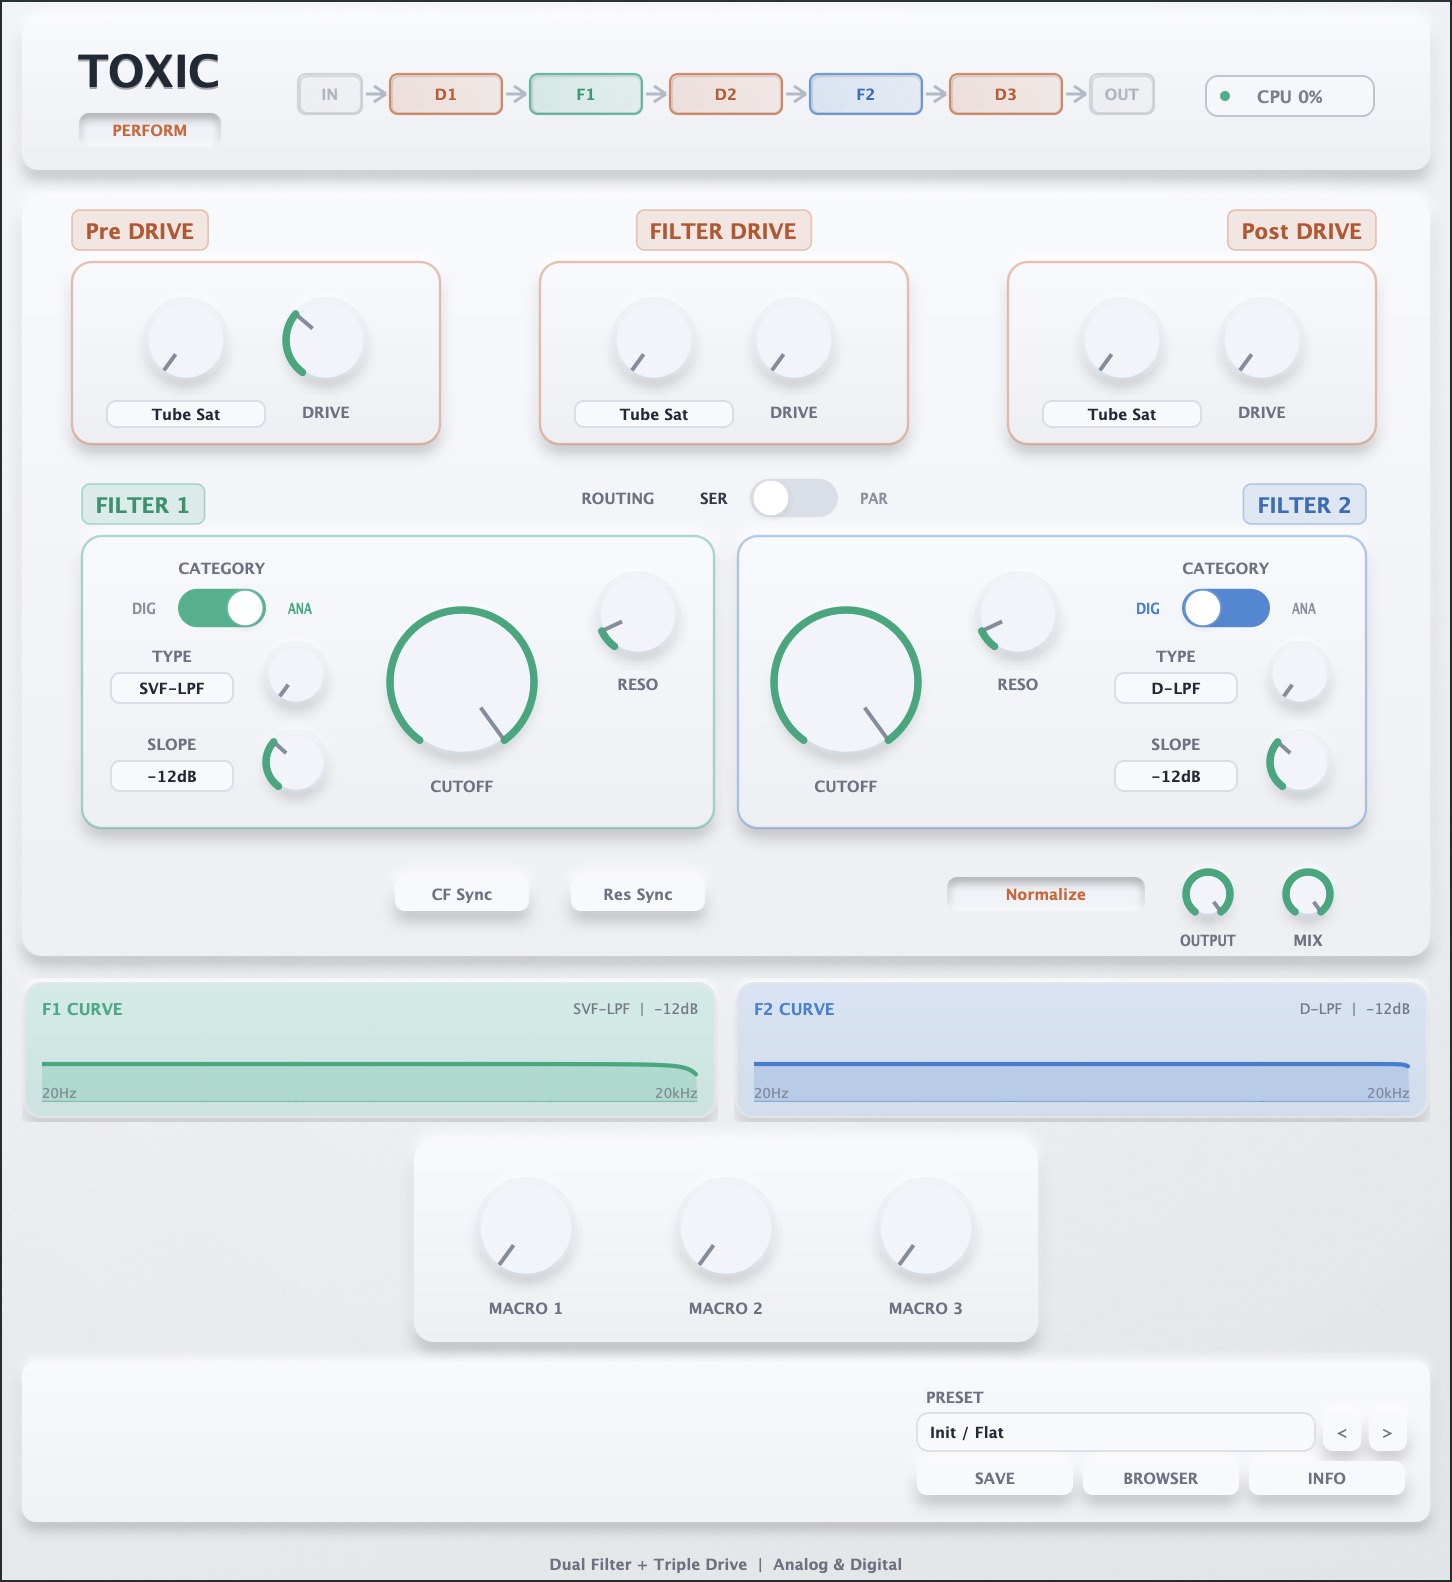
ライブ操作向けの簡易画面です。
主要なノブだけを大きく扱えるため、素早い音作りやステージ操作に向いています。
基本の使い方
まずは「音が出る状態」を短時間で作ってから、キャラクターを足していく手順が安定します。
最短 5 ステップ
- PreDrive と Mix で入力のドライブ量とDry音比率を決めます。
- Filter 1 / Filter 2 でキャラクターを作ります。
- PostDrive と Master Vol で倍音と最終音量を整えます。
- CF Sync / Res Sync を必要に応じて ON にして2段の連動を作ります。
- 最後に必要な分だけ LFO、Env、Macro を割り当てます。
初回スタート値の目安
- PreDrive: 0.10 - 0.20
- FilterDrive: 0.00 - 0.15 (Serial 時)
- PostDrive: 0.05 - 0.20
- Mix: 0.60 - 0.85
- Resonance: まずは低め (0.10 - 0.25) から開始
フィルターとトーン作り
Cutoff / Resonance
- Cutoff はフィルターの中心周波数です。
- Resonance はピークの強さや輪郭を決めます。
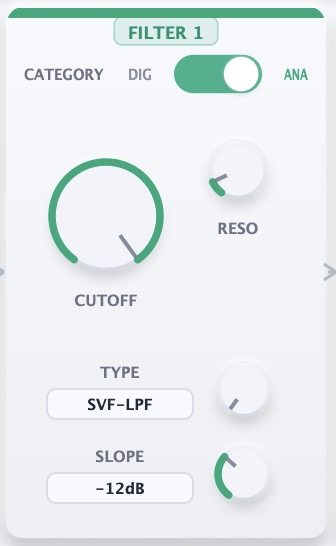
注記: -6dB (1 pole) のフィルターは、伝統的に構造上レゾナンス動作を持たないため、Resonance を上げても効果がほぼ出ません。Resonanceを使う場合は -12dB 以上で Resonance を調整してください。
Filter 1 / Filter 2 の特性
AnalogDigital各段ごとにカテゴリを切り替えられます。
視認性として、Analog を選択中はフィルターセクションの枠が緑、Digital を選択中は青で表示されます。
Category トグルスイッチ
Category は、各フィルター段のアルゴリズム群を切り替えるトグルです。Filter 1 と Filter 2 で独立して設定できます。
- Analog: アナログ回路を意識した質感。丸み、厚み、ドライブ時の有機的な変化を得やすい
- Digital: 明瞭で反応が速い質感。帯域を正確に狙う用途やシャープなトーン作りに向く
- 同じ Cutoff / Resonance 設定でも、Category を変えると倍音の出方と輪郭が大きく変化します
実践的には、Filter 1 を Analog、Filter 2 を Digital にして直列で使うと、太さと抜け感を両立しやすくなります。
Analog
- SVF-LPF / SVF-HPF / SVF-BPF / SVF-Notch / SVF-Peak
- OTA-LPF / OTA-HPF / OTA-BPF / OTA-Notch / OTA-Peak
- AP / M-LPF / K-LPF / J-LPF / Acid
Analogカテゴリは、フィルター処理内でわずかなサチュレーション感を伴うキャラクターです。カットオフ操作時の質感が丸く、ドライブ時に有機的な倍音が出やすくなります。
主な傾向は以下です。
- SVF系: 素直で扱いやすく、基準となる音作り向き
- OTA系: 中域の厚みと粘りを出しやすい
- AP: 位相キャラクター中心で、うねりや空間的な動きに向く
- M-LPF: 太めで押し出し感のあるローパス傾向 (80年代の代表的モノシンセ系ラダー)
- K-LPF: エッジ感と存在感を作りやすいローパス傾向 (日本産モノアナログ)
- J-LPF: なめらかでコーラス系とも相性の良いローパス傾向 (日本産DCOポリシンセ)
- Acid: レゾナンスの自己主張が強く、アシッド的なうねりを作れます。
Digital
- D-LPF / D-HPF / D-BPF / D-Notch / D-Peak
- D-AP / German LP / Comb
- Buzz LP / Buzz HP / Buzz BP
- Formant
- 563xx LPF / 563xx BPF / 563xx HPF
Digitalカテゴリは、輪郭が明瞭で反応が速く、狙った帯域をはっきり作りたいときに向いています。
- D-LPF/HPF/BPF/Notch/Peak: 基本形。精密でシャープな制御向き
- D-AP: 位相変化を主体にしたキャラクター
- German LP: 低域の厚みと中域の押し出しを作りやすいローパス傾向 (独系モノシンセの太いラダー感を意識した方向)
- Comb: 金属的な共鳴、櫛状のピーク/ディップを作る特殊型
- Buzz系: 倍音とザラつきを足して前に出す方向 (モダンなサチュレート系)
- Formant: 母音的な共鳴移動
- 563xx LPF / BPF / HPF: 24bit固定小数点DSP風の質感を狙ったフィルター。レジェンダリーなハードウェアVAシンセ的な硬質さや密度感を作る用途に向きます
注記: Analogの M-LPF / K-LPF / J-LPF / Acid と、Digitalの German LP / Buzz 系は、内部仕様上 Slope が固定です。これらのタイプでは Slope 表示は実効値を示さず、直前に選んでいた値が残って見える場合があります。
Filter Type 一覧
| カテゴリ | タイプ | 用途・傾向 |
|---|---|---|
| Analog | SVF-LPF / SVF-HPF / SVF-BPF / SVF-Notch / SVF-Peak | 基準となるState Variable Filter系。素直で扱いやすく、基本的なフィルター操作に向きます。 |
| Analog | OTA-LPF / OTA-HPF / OTA-BPF / OTA-Notch / OTA-Peak | OTA系の粘りや中域の厚みを狙ったタイプ。シンセ的な押し出しを作りやすいです。 |
| Analog | AP | 音量変化よりも位相変化を中心にしたAll-Pass系。うねりや動きの追加に向きます。 |
| Analog | M-LPF | ラダー系の丸い低域と太いレゾナンス感を狙ったローパス。 |
| Analog | K-LPF | ダイオードラダー系の鋭さと存在感を狙ったローパス。 |
| Analog | J-LPF | OTAラダー系の滑らかなローパス。なめらかで広がりのある質感に向きます。 |
| Analog | Acid | 強いレゾナンスとアシッド的なうねりを狙ったキャラクター。 |
| Digital | D-LPF / D-HPF / D-BPF / D-Notch / D-Peak | 明瞭で正確なデジタルSVF系。テンポ同期や細かいモジュレーションと相性が良いです。 |
| Digital | D-AP | 位相変化中心のデジタルAll-Pass。 |
| Digital | German LP | 4-pole系の太いローパス。低域の厚みと押し出しを作りやすいタイプです。 |
| Digital | Comb | 金属的な共鳴、フランジャー的なピーク、チューンドレゾナンス向き。 |
| Digital | Buzz LP / Buzz HP / Buzz BP | 内部でリミッティング感を持つ荒めのSVF系。ザラつきや倍音感を足しやすいです。 |
| Digital | Formant | 母音的な共鳴を作るタイプ。F1 / F2 Vowel と Low Boost が特に有効です。 |
| Digital | 563xx LPF / 563xx BPF / 563xx HPF | 24bit固定小数点DSP風のフィルター。2000年代のVAシンセ的な硬質さや密度感を狙うときに向きます。 |
Vowel / Formant 系
F1 Vowel / F2 Vowel は各フィルターのフォルマント位置を変えるコントロールです。
Formantを選択時のみVowelノブが出現します。
またSlopeが Normal と Low Boost の2択になり、Low Boost を使うと低域の存在感を補えます。
各ドライブの特性
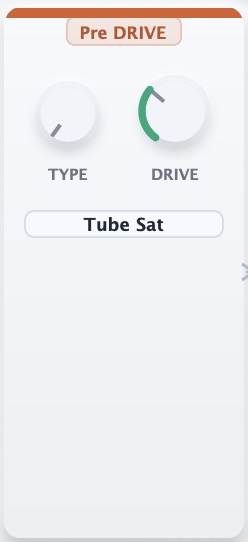
PreDrive (Drive 1)
入力段のドライブです。
Dry音のハリや倍音を上げる役割です。
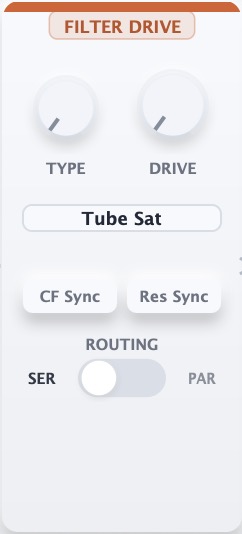
FilterDrive (Drive 2)
Filter 1 の後、Filter 2 の前段で効く中間ドライブです。
Filter 1で生成したレゾナンスをより強力に効かせる時に有効です。
また、Filterの接続がParallelの時は使用できません。
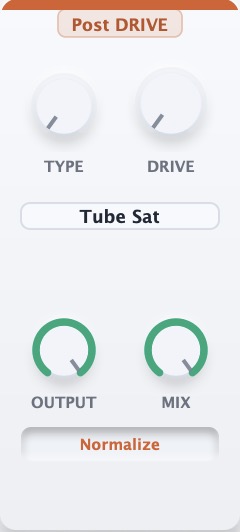
PostDrive (Drive 3)
出力側の最終色付けです。
全体をまとめながら存在感を足せます。
Drive Type のキャラクター
PreDrive / FilterDrive / PostDrive は共通のタイプ群を持ちます。
Serial では Input → PreDrive → Filter 1 → FilterDrive → Filter 2 → PostDrive → Mix の順に処理されます。
Parallel では Input → PreDrive → Filter 1 / Filter 2 の並列処理 → PostDrive → Mix となり、
FilterDrive は使用されません。
用途別の目安は以下です。
| Type | キャラクター |
|---|---|
Tube Sat | 真空管風の丸い飽和。太さと滑らかな圧縮感を足しやすいタイプ。 |
Diode Clip | シリコンダイオード風のクリップ。明るくエッジの立つ歪み。 |
Ge Clip | ゲルマニウム風の柔らかいクリップ。やや丸くビンテージ寄り。 |
Fold Si | シリコン系ウェーブフォールド。硬く明るい倍音を作ります。 |
Fold Schottky | 低しきい値で反応が速いフォールド。タイトで鋭い倍音向き。 |
Fold Ge | ゲルマニウム系の柔らかいフォールド。温かい非線形感を作ります。 |
Tape Sat | テープ風の飽和。高域の角を丸めながら密度を足します。 |
Crunch | ソフトな飽和から強めの歪みまで広く使える中域寄りのタイプ。 |
Soft Clip | ピークを自然に抑える滑らかなクリップ。 |
Hard Clip | 角の立った明確なクリップ。攻撃的な質感向き。 |
Sine Fold | サイン波的な曲線で折り返すフォールド。動きのある倍音を作ります。 |
Tri Fold | 三角波的な折り返し。幾何学的で硬めの倍音感。 |
Saw Fold | 鋸波的なラップ処理。最も荒いフォールド系キャラクター。 |
Bit Crush | ビット深度を落とすローファイなデジタル質感。 |
Decimator | サンプルレートを粗くするステップ状のデジタル破壊。 |
Master Vol / Mix
- PostDrive: 最終段のドライブ
- Master Vol: 最終音量
- Mix: Dry音とWet音の比率
Drive を上げた後は Master Vol で音量を揃え、Mix で処理量を決めるとバランスを取りやすくなります。
Normalize ボタン
Normalize は、Drive や Resonance を上げたときに発生しやすいレベル差を緩和し、音量を扱いやすくするための補助機能です。
- ON: 音色変化を保ちながら、過大な音量ジャンプを抑えやすい
- OFF: レベル変化も含めて積極的に使いたいとき向け
実用として ON を基本にし、意図的にレベル感を演出したい場面で OFF を試すのが扱いやすいです。
また、場合によってはNormalize によってサチュレーションが発生する場合があります。
CF Sync / Res Sync
Filter 1 を基準に Filter 2 を追従させる補助スイッチです。
単純な同値コピーではなく、ONにした時点の差分を保持して追従する方式です。
- CF Sync のアルゴリズム: ON時に「F2ノブ値 - F1ノブ値」の正規化オフセットを記録し、その後は F2 = F1 + 記録オフセット で追従します
- Res Sync のアルゴリズム: ON時に「F2実効Res - F1実効Res」のオフセットを記録し、その後は F2Res = F1Res + 記録オフセット で追従します
- F2ノブを動かして差分を作ると、その新しい差分が追従基準として再記録されます
- 細かく作り込みたいときは Sync を OFF にして各段を個別調整します
モジュレーション
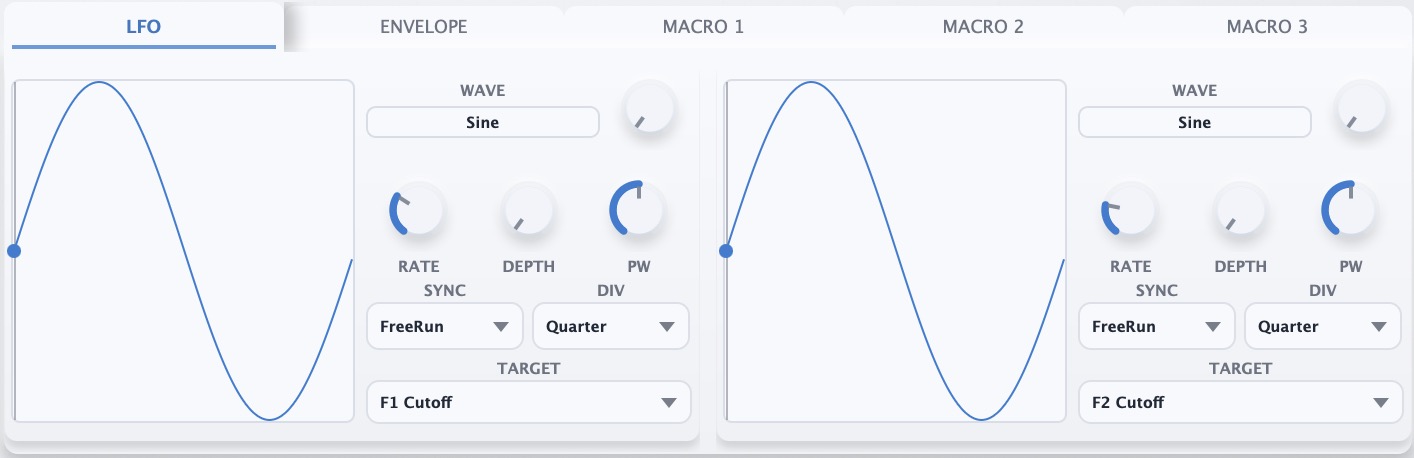
LFO 1 / LFO 2
- Rate: 変調速度
- Amount: 変調量
- Wave: 波形
- PW: パルス幅 (Pulse選択時のみ反応)
- Sync: ホスト同期 / 自由同期
- Target: 変調先
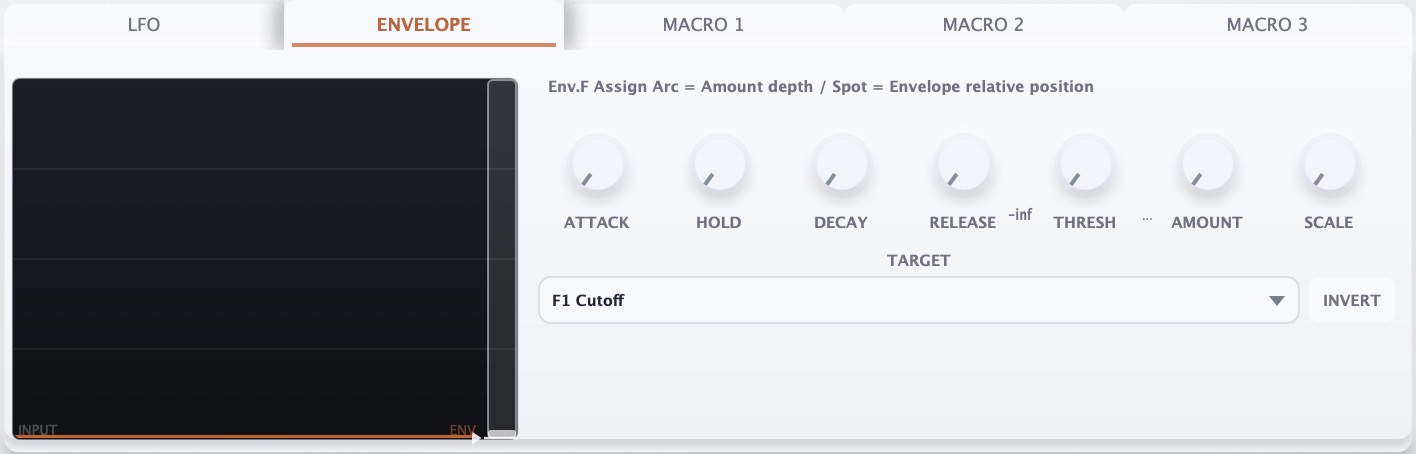
Envelope Follower
- Amount / Scale / Attack / Hold / Decay / Release / Threshold
- Target
- Invert
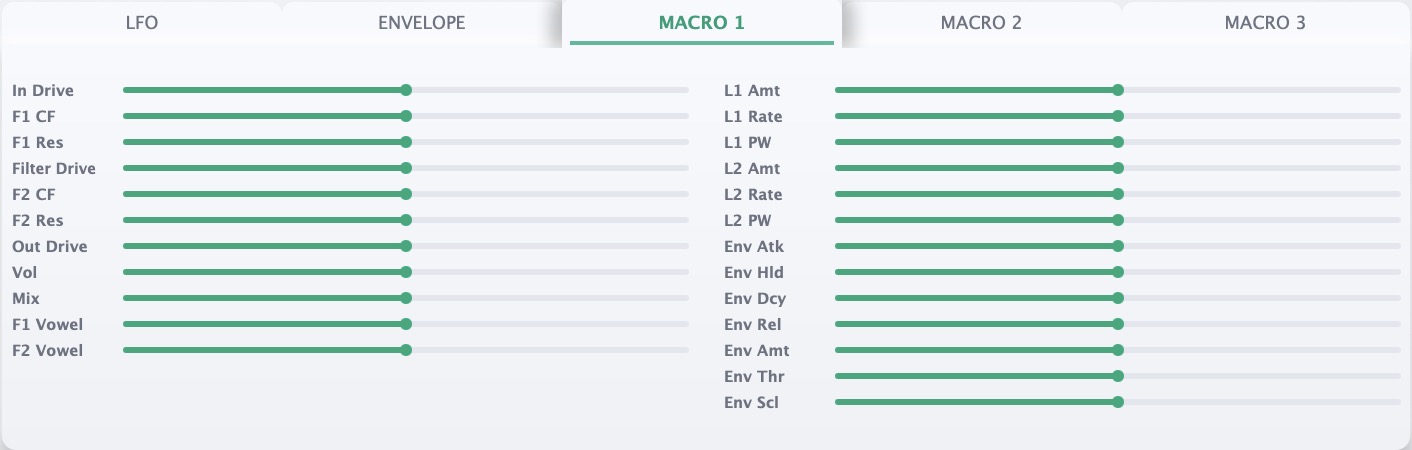
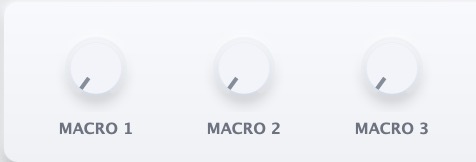
Macro 1 / 2 / 3
複数パラメータを1つのノブで同時制御します。Amount は正負の双方向に対応します。
Preset Browser
Preset Browser は、スコープツリーで絞り込みながらプリセットを探すための画面です。左側で分類を選び、右側のリストから目的の音色を選択します。
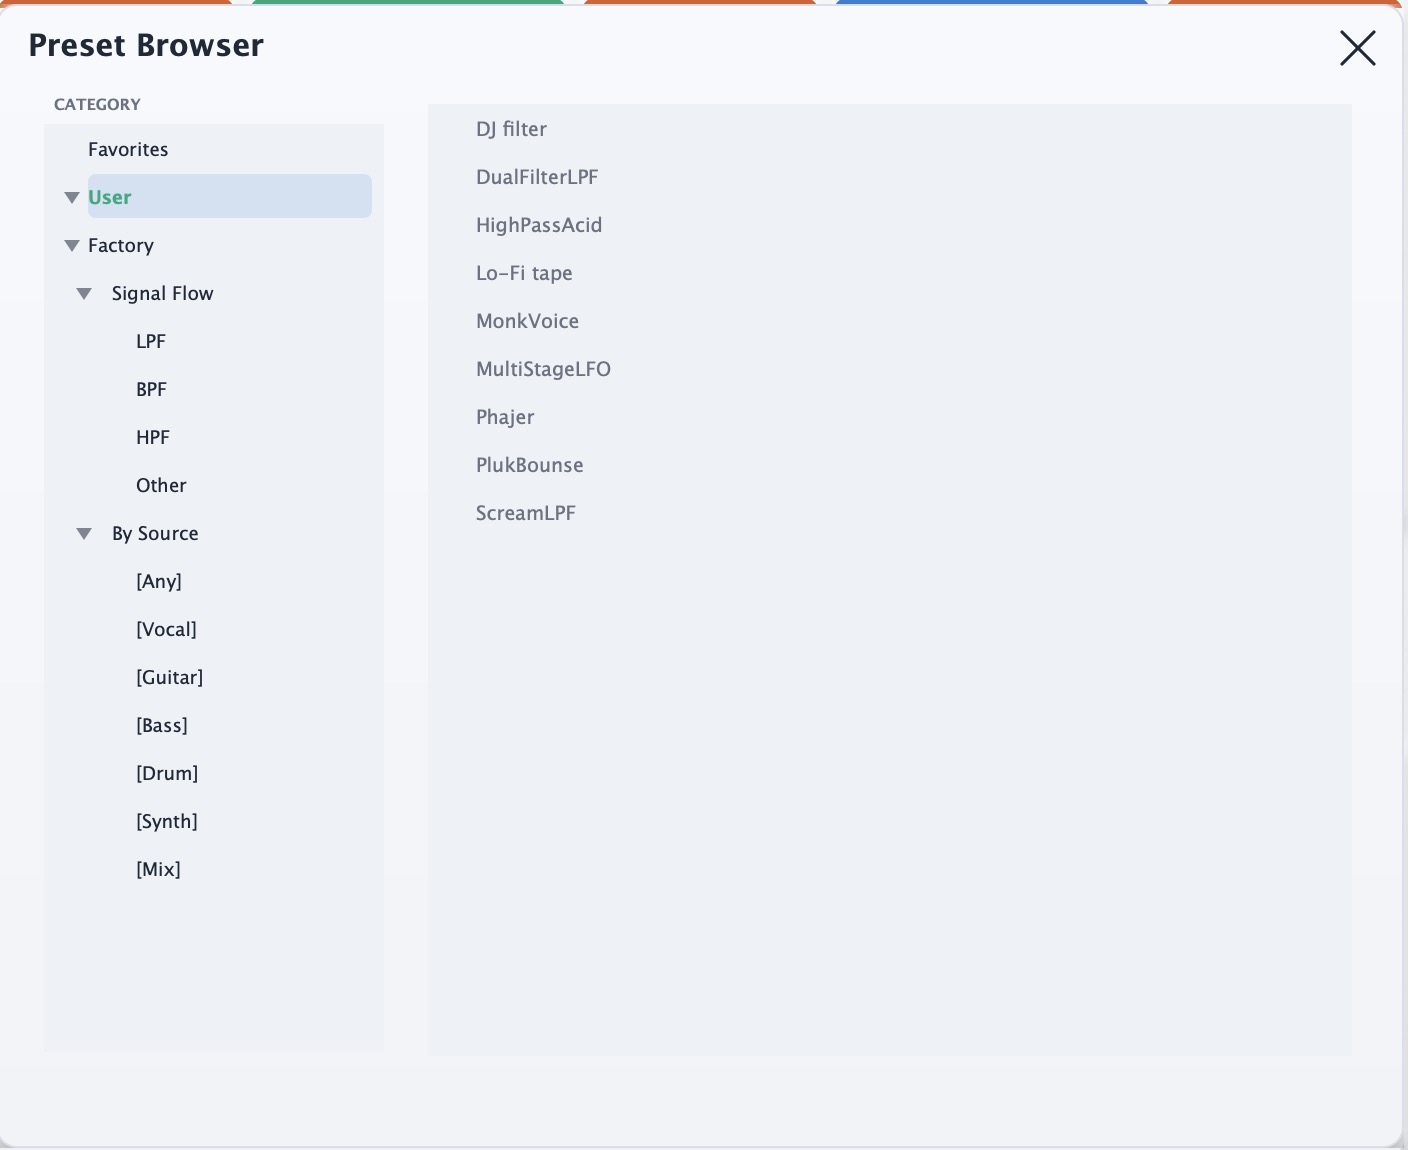
ツリー構成
- Favorites: よく使うプリセットを素早く呼び出すためのスコープ
- User: ユーザープリセット。階層フォルダを展開して管理できます
- Factory: 付属プリセット。以下の2系統で辿れます
- Factory / Signal Flow: 処理構成ベースの分類
- Factory / By Source: 音源や用途ベースの分類
基本操作
- ツリーの行をクリックしてスコープを選択します
- 三角マークをクリックしてフォルダを展開/折りたたみします
- 選択中スコープに含まれるプリセットだけがリストに表示されます
- リストからプリセットを選んで音を確認します
運用メモ: まず Factory で基準音色を選び、必要な調整を行ってから User 側へ保存しておくと、次回以降の再現が安定します。
アサイン表示
- 色付きアーク: アサイン量
- スポット: 現在のモジュレーション位置
- Macro / Env / LFO 重畳時も、表示はターゲット基準で更新
Perform 画面の操作
画面の見方
- 上部: Routing 切り替え、Perform モード切り替え
- 上段: DRIVE 3基
- 中段: CF 1 / RES 1 / CF 2 / RES 2
- 下段: Macro ストリップ
使い方の流れ
- Routing を Serial / Parallel で決める
- DRIVE でドライブ感を作る
- CF 1 / RES 1 で Filter 1 を決める
- CF 2 / RES 2 で Filter 2 を追加する
- Output と Mix で最終バランスを整える
- 必要に応じて Macro で一括操作する
Serial と Parallel
- Serial: Filter 1 → Filter 2 の順。濃い加工向き。
- Parallel: 2フィルター並列。広がりや分離感向き。
調整ポイント
- Cutoff を先に決め、Resonance を後で足すと扱いやすい
- Drive を上げすぎるとピークが鋭くなる場合がある
- ライブでは Macro 集約が有効
音作り例
1. ベーシックなオートワウ
- Cutoff を低めに設定
- Env Follower を Cutoff に割り当て
- Amount、Threshold、Attack、Release を調整
2. 動くシンセ的フィルター
- LFO 1 を Cutoff に割り当て
- 波形を Sine/Triangle に設定
- Rate をテンポに合わせる
3. Macro で複数パラメータ操作
- Macro 1 に Cutoff、Resonance、Drive を割り当て
- Cutoff は正、Resonance は負で設定
- Macro ノブで質感を一括変化
実用上の注意
- Macro/LFO Amount を極端に上げると音量変化や強いピークが出ることがあります。
- Resonance が高い設定では急激な動きで音が鋭くなる場合があります。
- 表示は視認性優先のため、見え方と音が完全一致しない場合があります。
迷ったときの確認項目
- Mix が 100% になっているか
- Output が極端に下がっていないか
- Cutoff / Resonance が意図した値か
- LFO / Env / Macro Target が正しいか
- Amount が 0 のままになっていないか
Overview
Toxic is a free filter plug-in for sound design built around two filter stages, three drive stages, LFOs, an envelope follower, and macros. It was created as an entry for the KVR Developer Challenge 2026.
The filter section is inspired by the dual-filter topology associated with legendary hardware VA synthesizers: serial/parallel routing, analog/digital character families, and formant-style movement rebuilt as a modern DAW effect. It is not a clone or an official emulation of any specific instrument.
- Filtering centered on cutoff and resonance
- Periodic modulation using LFO
- Input-reactive modulation using Envelope Follower
- Simultaneous multi-parameter control using Macros
- MIDI Learn support for assigning parameters
- Two UI systems, Perform and Expert, for live control and detailed editing
- Dual-filter architecture with Serial / Parallel routing
UI Layout
Expert
This is the detailed editing screen.
In addition to Drive, Filter 1, Filter 2, Output, and Mix, it includes LFO / Env / Macro sections in the lower area.
Perform
This is a simplified screen for live operation.
Major knobs are larger, making it suitable for fast sound design and stage use.
Quick Start
For stable results, first build a guaranteed "sound-on" state quickly, then add character step by step.
Fast 5-Step Flow
- Set input drive amount and Dry level ratio with PreDrive and Mix.
- Create character using Filter 1 and Filter 2.
- Balance density and final level with PostDrive and Master Vol.
- Turn CF Sync / Res Sync ON as needed to link both filter stages.
- Assign LFO, Env, and Macro only where needed.
Suggested Starting Values
- PreDrive: 0.10 - 0.20
- FilterDrive: 0.00 - 0.15 (in Serial routing)
- PostDrive: 0.05 - 0.20
- Mix: 0.60 - 0.85
- Resonance: start low first (0.10 - 0.25)
Filters and Tone
Cutoff / Resonance
- Cutoff controls the filter center frequency.
- Resonance controls peak intensity and contour.
Note: -6dB (1 pole) filters structurally do not provide resonance behavior in the traditional sense, so raising Resonance has little effect. When using Resonance, use -12dB or above.
Filter 1 / Filter 2 Characteristics
AnalogDigitalYou can switch category independently for each stage.
For visual feedback, the filter section frame is green while Analog is selected, and blue while Digital is selected.
Category Toggle
Category is the toggle that switches algorithm families for each filter stage. Filter 1 and Filter 2 can be set independently.
- Analog: Analog-circuit-oriented texture. Easier to get roundness, thickness, and organic change when pushed.
- Digital: Clear and fast response. Suitable for precise band targeting and sharper tone design.
- Even with identical Cutoff / Resonance settings, changing Category significantly changes harmonic behavior and contour.
In practice, using Filter 1 as Analog and Filter 2 as Digital in serial often balances body and clarity.
Analog
- SVF-LPF / SVF-HPF / SVF-BPF / SVF-Notch / SVF-Peak
- OTA-LPF / OTA-HPF / OTA-BPF / OTA-Notch / OTA-Peak
- AP / M-LPF / K-LPF / J-LPF / Acid
The Analog category has character with subtle internal saturation feel. Cutoff movement tends to feel rounder, and pushed settings tend to produce organic density.
Main tendencies are below.
- SVF family: straightforward and easy to handle, good as a baseline
- OTA family: easier to add midrange body and grip
- AP: phase-character focused, suitable for movement and spatial modulation
- M-LPF: thick, forward low-pass tendency (inspired by classic 80s mono synth ladder style)
- K-LPF: easier to build edge and presence (inspired by Japanese mono analog style)
- J-LPF: smoother tendency, pairs well with chorus-type sounds (inspired by Japanese DCO polysynth style)
- Acid: strong resonance character for acid-like motion
Digital
- D-LPF / D-HPF / D-BPF / D-Notch / D-Peak
- D-AP / German LP / Comb
- Buzz LP / Buzz HP / Buzz BP
- Formant
- 563xx LPF / 563xx BPF / 563xx HPF
The Digital category is clear and fast, suitable when you want to define target bands distinctly.
- D-LPF/HPF/BPF/Notch/Peak: basic shapes for precise and sharp control
- D-AP: phase-change-oriented character
- German LP: easier to create low-end thickness and mid push (inspired by heavy ladder feeling of German mono synth style)
- Comb: special type producing metallic resonance and comb-like peaks/dips
- Buzz family: adds harmonics and roughness for forward tone (modern saturated direction)
- Formant: vowel-like resonance movement
- 563xx LPF / BPF / HPF: 24-bit fixed-point DSP-style filters for a harder, denser VA-hardware-inspired response
Note: For Analog M-LPF / K-LPF / J-LPF / Acid and Digital German LP / Buzz family, Slope is fixed by internal specification. For those types, displayed Slope may not represent effective behavior and may appear as the previously selected value.
Filter Type List
| Category | Type | Use / Character |
|---|---|---|
| Analog | SVF-LPF / SVF-HPF / SVF-BPF / SVF-Notch / SVF-Peak | Baseline state-variable filter family. Straightforward, flexible, and useful for classic filter movement. |
| Analog | OTA-LPF / OTA-HPF / OTA-BPF / OTA-Notch / OTA-Peak | OTA-style response with more grip and midrange body for synth-like motion. |
| Analog | AP | All-pass movement focused on phase color rather than conventional tone removal. |
| Analog | M-LPF | Rounded ladder-style low-pass character with thick resonance. |
| Analog | K-LPF | Sharper diode-ladder-style low-pass with more bite and presence. |
| Analog | J-LPF | Smooth OTA-ladder-style low-pass for silky, wide movement. |
| Analog | Acid | Focused acid-style resonance and animated low-pass movement. |
| Digital | D-LPF / D-HPF / D-BPF / D-Notch / D-Peak | Clean digital SVF shapes for precise modulation and tempo-synced movement. |
| Digital | D-AP | Digital all-pass filtering for animated phase coloration. |
| Digital | German LP | Four-pole-style low-pass for strong low-end body and forward contour. |
| Digital | Comb | Comb filtering for metallic resonance, flanging-like peaks, and tuned resonant effects. |
| Digital | Buzz LP / Buzz HP / Buzz BP | Rougher SVF-inspired filters with internal limiting feel for extra harmonics and buzz. |
| Digital | Formant | Vocal-style formant response. Especially useful with F1 / F2 Vowel and Low Boost. |
| Digital | 563xx LPF / 563xx BPF / 563xx HPF | 24-bit fixed-point DSP-style filters for a harder, denser legendary-VA-inspired response. |
Vowel / Formant
F1 Vowel / F2 Vowel control the formant position for each filter.
The Vowel knob appears only when Formant is selected.
Slope also becomes a two-choice mode: Normal / Low Boost.
Low Boost can reinforce low-end presence.
Drive Characteristics
PreDrive (Drive 1)
This is the input-stage drive.
It adds attack, density, and harmonic weight to the dry source.
FilterDrive (Drive 2)
This is the middle drive stage after Filter 1 and before Filter 2.
It is useful when you want stronger emphasis on the resonance created by Filter 1.
It is not available when filter routing is set to Parallel.
PostDrive (Drive 3)
This is the final output-stage coloration.
It can add presence while gluing the overall tone.
Drive Type Character
PreDrive / FilterDrive / PostDrive share the same drive type set.
In Serial routing, the path is Input → PreDrive → Filter 1 → FilterDrive → Filter 2 → PostDrive → Mix.
In Parallel routing, the path is Input → PreDrive → Filter 1 / Filter 2 in parallel → PostDrive → Mix,
and FilterDrive is not used.
Practical tendencies are below.
| Type | Character |
|---|---|
Tube Sat | Smooth tube-style saturation for rounded density and gentle compression. |
Diode Clip | Silicon diode-style clipping with a direct, bright edge. |
Ge Clip | Softer germanium-style clipping with a rounder, vintage-leaning breakup. |
Fold Si | Silicon-flavored wavefolding for sharper harmonic folding. |
Fold Schottky | Lower-threshold fold character with a tighter, faster response. |
Fold Ge | Softer germanium-flavored folding for warmer nonlinear motion. |
Tape Sat | Tape-style saturation that adds density while smoothing high-end edges. |
Crunch | Wide-range distortion that moves from soft saturation toward stronger drive. |
Soft Clip | Smooth clipping for controlled level and musical density. |
Hard Clip | Angular clipping for obvious distortion and stronger attack. |
Sine Fold | Sine-shaped folding for animated nonlinear tone. |
Tri Fold | Triangle-style folding with more geometric harmonic motion. |
Saw Fold | Sawtooth wrapping for the roughest folding texture. |
Bit Crush | Bit-depth reduction for lo-fi digital grit. |
Decimator | Sample-rate reduction for stepped, alias-like digital destruction. |
Master Vol / Mix
- PostDrive: final push stage
- Master Vol: final output level
- Mix: dry/wet ratio
After increasing Drive, set level with Master Vol and decide processing amount with Mix for better balance.
Normalize Button
Normalize is an assist function to reduce level variance that tends to appear when Drive or Resonance is increased, making output level easier to manage.
- ON: easier to suppress excessive level jumps while keeping tonal changes
- OFF: suitable when you want to use level movement as part of expression
In practice, using ON as the default is the easiest approach, then try OFF when you intentionally want level movement as part of the sound.
Depending on the setting, Normalize itself may also generate additional saturation.
CF Sync / Res Sync
These are helper switches that make Filter 2 follow Filter 1.
This is not a simple same-value copy; it follows while holding the difference captured at the moment Sync is turned ON.
- CF Sync algorithm: when ON, it records normalized offset "F2 knob value - F1 knob value", then follows using F2 = F1 + recorded offset.
- Res Sync algorithm: when ON, it records effective offset "F2 effective Res - F1 effective Res", then follows using F2Res = F1Res + recorded offset.
- If you move the F2 knob to create a new difference, that new difference is re-recorded as the follow reference.
- For fine independent design, turn Sync OFF and adjust each stage separately.
Modulation
LFO 1 / LFO 2
- Rate: modulation speed
- Amount: modulation depth
- Wave: waveform
- PW: pulse width (responds only when Pulse wave is selected)
- Sync: host-sync / free-run
- Target: modulation destination
Envelope Follower
- Amount / Scale / Attack / Hold / Decay / Release / Threshold
- Target
- Invert
Macro 1 / 2 / 3
Control multiple parameters simultaneously with one knob. Amount supports both positive and negative directions.
Assignment Display
- Colored arc: assignment amount
- Spot marker: current modulation position
- Even when Macro / Env / LFO overlap, display updates per target logic
Preset Browser
Preset Browser is a screen for finding presets while narrowing by scope tree. Choose category on the left, then select target sound from the right list.
Tree Structure
- Favorites: scope for quick access to often-used presets
- User: user presets, manageable with expandable folder hierarchy
- Factory: bundled presets, browsable via two systems below
- Factory / Signal Flow: processing-structure-based classification
- Factory / By Source: source/use-based classification
Basic Operation
- Click a tree row to select scope.
- Click triangle mark to expand/collapse folders.
- Only presets included in the selected scope appear in the list.
- Select a preset from the list to audition sound.
Workflow note: First choose a baseline preset in Factory, then save adjusted result into User to improve recall consistency next time.
Perform Screen Operation
How to Read the Screen
- Top: Routing switch, Perform mode switch
- Upper row: 3 DRIVE blocks
- Middle row: CF 1 / RES 1 / CF 2 / RES 2
- Lower row: Macro strip
Basic Flow
- Choose routing: Serial or Parallel.
- Create push and density with DRIVE.
- Set Filter 1 with CF 1 / RES 1.
- Add Filter 2 character with CF 2 / RES 2.
- Adjust final balance with Output and Mix.
- Use Macro for simultaneous live control when needed.
Serial and Parallel
- Serial: Filter 1 then Filter 2. Suitable for deeper processing.
- Parallel: two filters in parallel. Suitable for width and separation.
Adjustment Tips
- It is easier to control by setting Cutoff first and adding Resonance afterward.
- Too much Drive can make peaks sharper in some settings.
- For live use, macro consolidation is effective.
Sound Examples
1. Basic Auto-Wah
- Set Cutoff to a lower range.
- Assign Env Follower to Cutoff.
- Adjust Amount, Threshold, Attack, and Release.
2. Moving Synth-style Filter
- Assign LFO 1 to cutoff.
- Set waveform to Sine or Triangle.
- Match Rate to song tempo.
3. Macro Multi-Parameter Control
- Assign Cutoff, Resonance, and Drive to Macro 1.
- Set Cutoff positive and Resonance negative.
- Use the macro knob to shift texture in one motion.
Practical Notes
- If Macro/LFO Amount is raised excessively, strong level changes or sharp peaks may occur.
- With high Resonance settings, rapid movement can sound sharper.
- Display is optimized for readability, so visual behavior and sound may not be perfectly identical.
Checklist
- Check whether Mix is at the intended value.
- Check whether Output is unintentionally too low.
- Check whether Cutoff / Resonance values are intended.
- Check whether LFO / Env / Macro Target is correct.
- Check whether Amount is still at zero.